


Why User login status is important?
Last seen is used to show how active this person is. WordPress offers a bunch of useful and amazing features to create multiple users with different roles. Here we are using a website that will tell us how many times the users have visited the website and also the exact time details to get the hidden Last seen status of a person.
From a business perspective, active users and their login timings are important because they generate revenue. A good website needs active users to survive, so a healthy count of active users is a positive sign of success. Calculating the number of active users on the website for each active time can help assess the effectiveness of the campaign.
There are many options to display the user’s login timing in the word-press. Like, you can use the WordPress plugin, or you can develop your custom functions to see the active users timing on the dashboard, also in Users Add New Columns For login status.
Here we are going to discuss and learn how to create a custom dashboard widget on WordPress and add the custom columns. For this, you can write a custom function in the functions.php file or you can develop a separate plugin separately. Here we are going to develop a custom plugin to display active user counts on Dashboard.
Write below code users.php plugin File
date_default_timezone_set( 'Asia/kolkata' );

//Record user's last login to custom meta
add_action( 'wp_login', 'login_time', 10, 2 );

function login_time( $user_login, $user ) {
  update_user_meta( $user->ID, 'last_login', time() );
}

//Register new custom column with last login time
add_filter( 'manage_users_columns', 'user_last_login_column' );
add_filter( 'manage_users_custom_column', 'last_login_column', 10, 3 );

function user_last_login_column( $columns ) {
	$columns['last_login'] = 'Last Login';
	return $columns;
}

function last_login_column( $output, $column_id, $user_id ){
	if( $column_id == 'last_login' ) {
    $last_login = get_user_meta( $user_id, 'last_login', true );
    $date_format = 'M j, Y';
    $hover_date_format = 'F j, Y, g:i a';

$output = $last_login ? '‘ : ‘No record’; } return $output; } //Add [lastlogin] shortcode function lastlogin_shortcode( $atts ) { $atts = shortcode_atts( array( ‘user_id’ => false, ), $atts, ‘lastlogin’ ); $last_login = get_the_author_meta(‘last_login’, $atts[‘user_id’]); if( empty($last_login) ){ return false; }; $the_login_date = human_time_diff($last_login); return $the_login_date; } add_shortcode( ‘lastlogin’, ‘lastlogin_shortcode’ );
When you will insert that code in users.php Plugin File or Directly you will add in functions.php file.
After ThatIn Dashboard -> Users Add Another Column – Last Login.
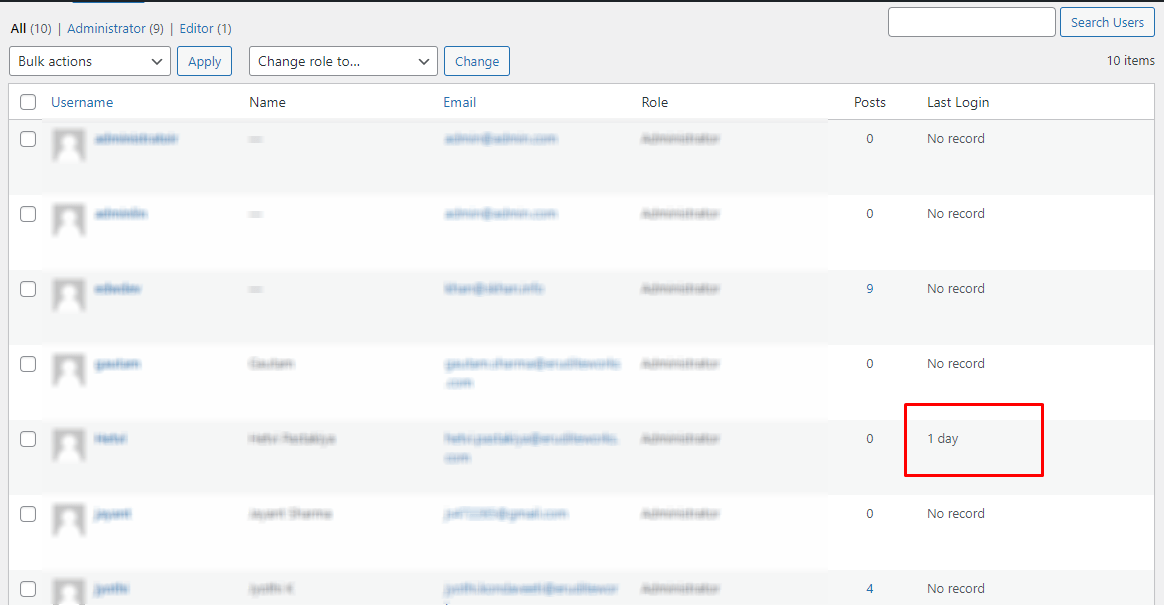
In that image, you can display the last Column added and you can see all user’s last login details.
In users.php File,
We already added the dashboard_activeusers function,
Now we will modify that code and Display Current login users’ time displaying in Dashboard Widget.
function dashboard_activeusers(){
		$user_count = count_users();
		$users_plural = ( $user_count['total_users'] == 1 )? 'User' : 'Users'; //Determine singular/plural tense
		echo '<div><a href="users.php">' . $user_count['total_users'] . ' ' . $users_plural . '</a>
		      <small> (' . online_users('count') . ' currently active) </small>
			  </div><br>';
	   //print_r(online_name('name'));
	  echo "<h1>Active User's List</h1><hr>";
	?>
<table border-collapse ='collapse' border = '1' cellpadding ='5'  bgcolor = 'F3FFFF' bordercolor ='#565051'>
    <tr>
        <th>User Name
	    <th>Email ID
	    <th>Active From Last
    </tr>
    <?php
    $i = 1;
    foreach (online_name('name') as $key => $value) {
		$ltime=human_time_diff(get_user_meta("${value['id']}", 'last_login', true ));
        echo "<tr>";
        echo "<td>" . "${value['username']}" . "</td>
		      <td>" . "${value['useremail']}" . "</td>
			  <td>" . $ltime . "</td>";
        echo "</tr>";

        $i++;
    }
    ?>
</table><?
}
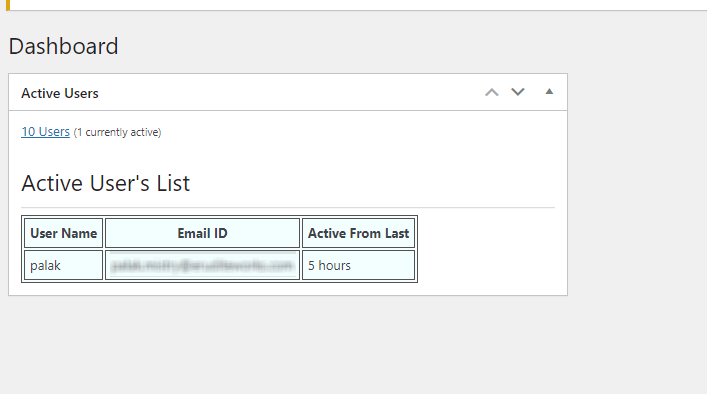
After Adding that code, In Dashboard You can Display All Data like the Current logged-in User Name, User Email ID & Last Login Details.
Are you looking for the best IT consulting company that specializes in salesforce consulting, mobile app development services, and web application development services. Look no further Contact Us and let us help you with your needs.
Also Read: Remove Additional CSS from the WordPress Customizer


0 Comments